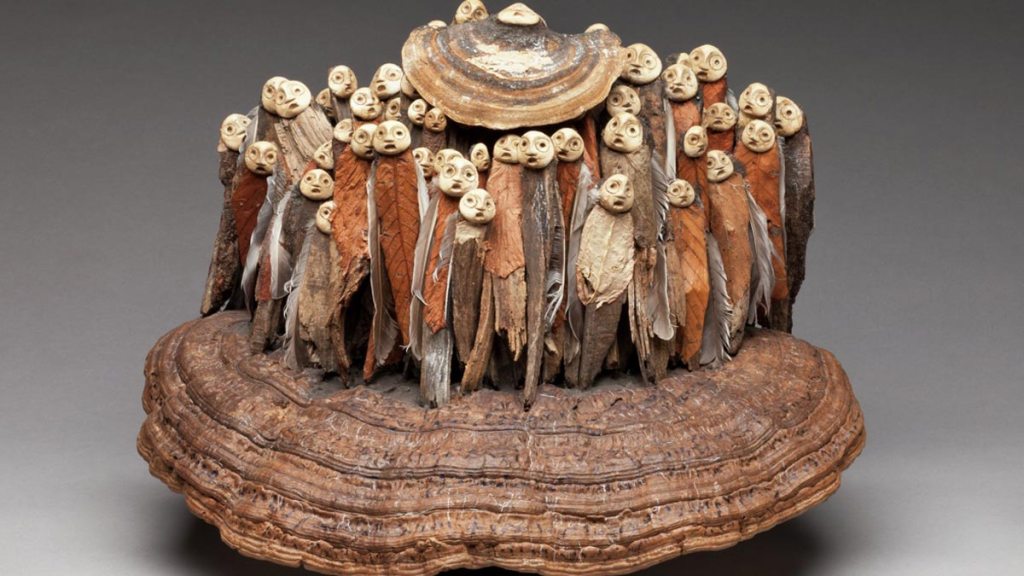
Now that it is officially spring, I love going outdoors to enjoy fresh air, sunshine, and exercise—and to explore nature. The artist Jephan de Villiers (HEFF-an duh vil-ee-AY) was inspired by the things he found in nature. As a child, de Villiers was often sick, which forced him to spend a lot of time in his bedroom. Being inside so much made him appreciate the outdoors even more. Leaves, branches, nuts, feathers, and fungi became his art supplies.
Before we venture outside to create our own nature-inspired sculptures, we will need to find a base that we can add natural materials to. Start with a cardboard toilet paper tube. You can remove the tube from a full roll of toilet paper by grabbing the cardboard and gently twisting it inside the paper. It should become loose enough for you to pull it out. The tube will act as the “body” of your sculpture. Use your cardboard toilet paper tube to trace a circle on a piece of paper or thin cardboard. Cut the circle out. Kids—have a grown-up help you with scissors, if you need. This circle will be the head of your sculpture.

Now draw a face on your circle. What expression, or emotion, will your face show? Mine will look super happy! After you draw your face, attach it to the top of your tube. I am working on three sculptures at once, so I attached my faces in three different ways. For the first, I cut two notches in the tube and put the face in. A notch is a small cut that another flat object can slide into. For the second, I taped the back of the face to the inside of the tube. For the third, I simply squeezed the face inside the tube. There are a number of different ways you can attach your faces.

The last step involves collecting and attaching your natural materials. Make sure the materials you collect are mostly clean. You can collect your objects and bring them inside to attach, or you can bring your scissors and tape outside with you. Today, the weather is very nice, so I will work outside.

As you begin collecting, think about the different textures of natural materials. How are certain objects alike, and how are they different? How many different kinds of leaves can you find? Observe the plants that are starting to grow. How can you tell they are growing? For me, this time of year is exciting because all of the beautiful spring plants are coming back!

To attach your materials to the tube, you can cut notches in the sides and slide your objects in (just like I did to attach my first face), or you can use tape and glue. Stringy materials can be wrapped and tied around the tube. I used all of these methods to attach my materials.

Make more than one! Jephan de Villiers sees his figures as part of a community, and his sculptures often include many little figures. Share your forest friends with us on social media, and watch our online village grow! Tag @MilwaukeeArt and use #MAMStudioAtHome.

Kohl’s Studio at Home activities are designed to be enjoyed with the whole family, regardless of age. Families can work together to learn new techniques and materials, and to explore creativity. As with all new things, provide your child the support and supervision that they need for their developmental level, practicing safe use of tools and materials. You know your kids best!

Brett Henzig is the Youth & Family Programs Educator. He manages the Kohl’s Art Studio, leads school tour workshops, and teaches Youth Studio Classes and Summer Art Camps. Outside the Museum, you’ll find Brett making art, rescuing injured wild animals, and spending time with his wife, son, dog, cat, and rabbit.